To log on
1. Double-click the CQGNet icon on your desktop.
If you do not have an icon on your desktop, go to Start > All Programs > CQG > CQGNet > CQGNet.
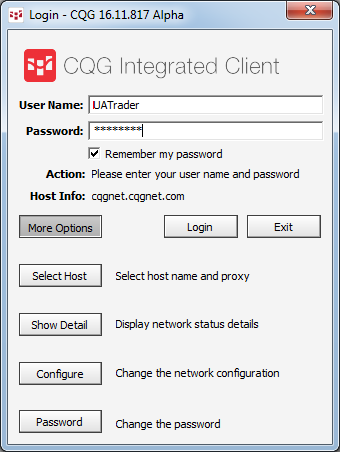
2. On the Login window, enter your user name and password.
Password must include: at least 8 characters, alpha and numeric characters, at least one special character, and both upper and lower case.
3. Click the Login button. If you are asked to upgrade.
The NETS Core and Supervisor auxiliary programs run while the software is running. These programs start automatically when CQG begins and are hidden by default. Do not close these programs while CQG IC is running.
Click the More Options button to expose additional options: select your host name and proxy, display network status information, change your network configuration, or change your password.
Accessing the trading system requires a separate logon. See Logging On and Off the Trading System.
To change your password
1. On the Login window, click the More Options button.
2. Click the Password button. This displays the Set New Password window.
3. Enter your old password.
4. Enter your new password.
5. Enter your new password again in the Verify field.
6. Click the Change button to change your password and close the Set New Password window.
To log off
Choose one of these ways to log off and close CQG IC.
•Click the Exit button, which is on the System toolbar.
•Click the CQG program icon on the title bar then click Exit CQG Integrated Client..
•Click the Support button, then click Exit CQG Integrated Client.
•Click System on the menu, then click Exit CQG Integrated Client.
If you have open orders when you attempt to exit, the system asks whether you want to cancel them.
To restart
Choose one of these ways to restart CQG IC:
•Click the CQG program icon on the title bar then click Restart CQG Integrated Client..
•Click the Support button, then click Restart CQG Integrated Client.
•Click System on the menu, then click Restart CQG Integrated Client.
More Options
Click the More Options button on the Login window to expose advanced options. With the exception of changing your password, these options are used primarily when you’re working with CQG support.


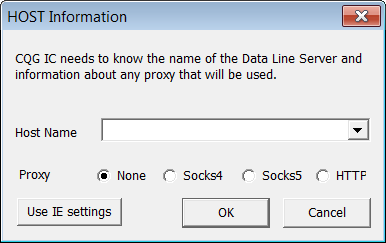
You may be asked to change the host name if you are having problems logging on. Problems may include DNS resolution problems, routing issues, and corporate firewall issues. The proxy setting is applicable only if you are connecting to the internet through a proxy.
1. On the Login window, click the More Options button.
2. Click the Select Host button.
3. Type the new host name provided to you by customer support.
4. Click OK.
To change the proxy, select Socks4, Socks5, or HTTP.