Orders and Positions provides all of the functionality you need to fully manage your orders and positions.
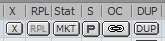
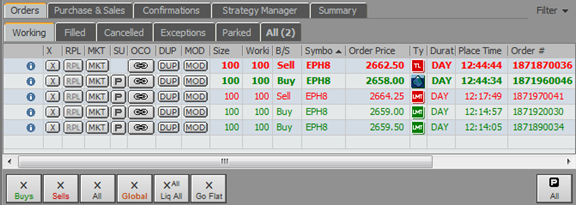
Each of the tabbed windows on the Orders pane has associated action buttons, which can be added in preferences:
Additionally, cancel and park buttons are at the bottom of the pane.
•X Buys = cancel all buy orders for current symbol for the current account
•X Sells = cancel all sell orders for current symbol for the current account
•X All = cancel all orders for this symbol for the current account
•X Global = Cancel all orders for all symbols and all accounts
•X Go Flat (go flat button) = cancel all orders and liquidate all positions for this symbol for the current account, on by default
•X All Liq All (liquidate button) = Cancel all orders for all symbols and liquidate all positions for the current account and for mapped ones
Note: Speculation Type was introduced in response to MiFID regulations. It is relevant only if Speculation Type applies to the instrument or leg instrument (in the case of strategies) in use. Speculation Type cannot be changed when you modify, activate, or park an existing order.
To cancel a single order
1. Select the order to be cancelled.
2. Click the X button.
You also use the Delete key on your keyboard.
To cancel more than one order
1. Select the rows you wish to cancel.
2. Right-click one of those rows.
3. Click Cancel Selected Orders.
To change an existing stop or limit order to market
1. Select the order to be changed.
2. Click the MKT button. The system cancels the current order and places a new market order.
When market orders are not allowed for a commodity, the MKT button is not displayed.
To combine existing orders into a single OCO
1. Select the first order to be combined.
2. Click the OCO
button for that order. The button turns orange, and the icon on the left changes
from  to
to  .
.
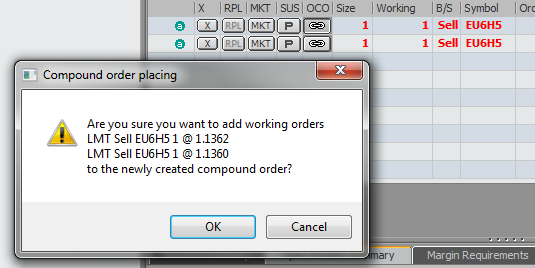
3. Click the OCO button for the next order you wish to combine. Again, the icon changes. Repeat this step for each order you wish to be part of the OCO.
4. After all orders have been selected, click the OCO button that corresponds to the first order you added. Your OCO order is complete.
Upon execution of one of the orders, the other order is cancelled automatically.
To create an OCO if you have only one open order
1. Select the order to be included in the OCO order.
2. Click the OCO
button for that order. The button turn oranges, and the icon on the left changes
from to .

3. Place another order. You receive a confirmation message for that order.
4. Click the OCO button for this order if you to combine it with the first order into a single OCO. The button becomes gray and the order icon changes.

Repeat steps 3-4 for each order you wish to be part of the OCO.
5. After all orders have been placed, click the OCO button (in orange) for the first existing order.
6. Click OK on the confirmation window.
Your OCO order is complete.
Upon execution of one of the orders, the other orders are cancelled automatically.
To duplicate an order
1. Select the order to duplicate.
2. Click the DUP button.
3. If you have order confirmations enabled, click Place Order.
The duplicate order is an exact match to the first order – same symbol, size, duration, side, price, etc. You can change parameters on the confirmation. Changes are indicated by an asterisk.
To change the size of an order
1. Click the size field of the order you want to change. You’ll notice a flashing cursor when you have successfully selected the field.
2. Change the size value by typing another number.
3. Click the RPL button. A confirmation window opens.
4. Click OK.
To modify the price of an order
1. Click the price field of the order you want to change. You’ll notice a flashing cursor when you have successfully selected the field.
2. Change the price by typing another price or part of a price.
3. Click the RPL button. A confirmation window opens.
4. Click OK.
To change the duration of an order
1. Click the duration field of the order you want to change. A duration menu is displayed.
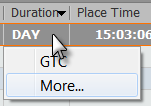
2. If the option you want is not displayed, click More to open the Select a Duration window.
3. Click the arrow to see the complete duration menu.
4. Click a duration.
5. Click OK.
To change the account (Orders and Positions)
1. Click the Account field.
2. Select an account from the Account Picker.
3. Click OK.
To suspend (park) all orders
Suspend all working orders by clicking the Park All button.

You can also click the Park All button on the toolbar.
To suspend orders by side, symbol, or account
Right-click the Park All button to open the Park All Orders window, then select which orders to suspend: all, buys, sells, all symbols, a particular symbol, all accounts, a particular account.
To suspend an order
Suspend a single order by clicking the P button on the order row:

To suspend an order for a specific amount of time
Right-click the working order and then park it for 5, 10, or 30 minutes. You can also set a date and time by clicking Park Until.
To activate an order
Activate a single order by clicking the ACT button on order row.
You can also right-click the row and click Activate.
To activate buys or sells
Activate orders by side by clicking either the Activate Buys or Activate Sells button on the Parked window:
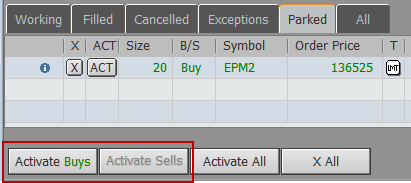
To activate all orders
Activate all orders by clicking the Activate All button on the Parked window.
You can also click the Activate All button on the toolbar.
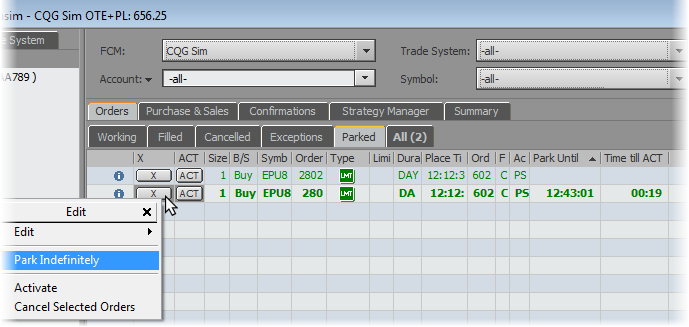
To cancel automatic activation of orders
Automatic activation for orders in the Park Until and Time till ACT states can be easily canceled by right clicking on the cancel button and selecting “Park Indefinitely.” This will return the order to original suspended state.
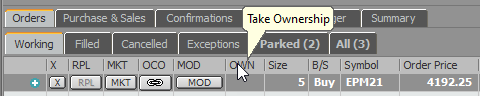
Take Ownership
Take Ownership is used if two or more traders are trading the same account and, for example, the first trader's shift ends and a second trader can "take ownership" of an order. Click on the button in the OWN column and generates a modify request to change Globex "Tag 50"/"operator ID". Other attributes (price, size, side, etc.) will not be changed.