Accounts cannot be added or removed if a migration request is in progress.
1. Go to Accounts > New Account.
2. Using Search, find and select the customer who owns this account.
Account Information
3. Set a location.
This field is automatically populated but can be changed. If the account does not have a trader associated with it, then the account inherits the FCM location. If the account does have a trader associated with it, then the account inherits the trader location. Once a location has been assigned, the field is unavailable, and you must submit a migration request through CQG’s FCM Desk.
4. Assign an account name, number, and sales series.
5. Select an account type:
Customer Account: an account for any other customer
Another Member: an account for another member on the exchange floor
House Account: an account for the clearing firm
Own Account: an account for the member
6. Select how you would like account statements processed:
Process statements as received from FCM: Select this option if you send daily statements to CQG via FTP. The system compares the data you send to the data we receive. FCM data takes precedence. The system deletes those transactions that are not on the FCM statement and adds the transactions that are. Order information is archived when the statement is processed.
Generate complete daily statement: Select this option for simulated clearing. CQG generates a daily statement using our data. Order information is archived when the statement is generated.
Zero positions at the end of day: Select this option if you do not send statements to CQG and you do not want simulated clearing. With this option, trades are confirmed and order and fill information is archived, but there’s no matching or offset information generated. Reconciliation uses trade confirmations and fills.
The availability of the other options in this section depends on the method of processing you choose.
7. Select the give-up account check box if the account is a give-up. You can also choose the FCM that trades are given up to.
8. To place single trades that are disbursed to several accounts, select the Block account checkbox. You can also enter a size for the order multiplier. If you select this option, then processing is changed to Zero positions at the end of day.
Only orders that are a multiple of that number are allowed. So, for example, if you are allocating trades to four accounts, you might set the size to four to avoid a situation where you have an odd number of lots to allocate to four accounts.
9. To limit the times during which this account can be traded, click the Account Trading Times check box and enter the time boundaries.
10. Select whether you want fills and trade confirmations reconciled.
No: The data in the system is overlaid with the data from the back office. You may select this option for a particular account to avoid reconciliation errors because the account is not included in your daily statement (such as a give-up).
Yes: The system alerts you to the differences between its data and the back office data.
Use FCM Setting: This value defaults to the FCM’s setting for reconciliation.
11. The Instruct Account check box allows the offsetting of opposite-side positions as part of statement parsing. When selected, opposite-side positions reported in back office data are offset. This net position after offsetting is the statement position reported in your trading application. It is selected by default.
12. Optionally, select the Allow externally provided execution account.
13. If applicable, select the MODES account group for this account.
Routing Options
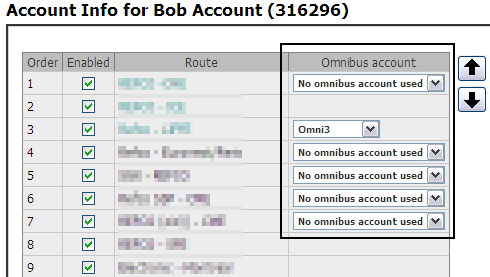
14. Select the exchanges that this customer can route to. Use the arrows to change the priority of the route.
15. If applicable, select an associated omnibus account.
A regular account can share a route with an omnibus account. When a Gateway administrator sets up the FCM account, omnibus support is identified as being prohibited, required, or allowed. The Omnibus account field displays accounts based on the support setting. The default account is the omnibus account with the highest relative priority, which is set by the administrator.

16. Optionally, enter attributes for the route. The FCM-specified value of this field differs depending on the route. For more information, contact the FCM desk.
17. The column titled “Allow Synthetic Order Types” This column is shown for all accounts and all users (who have access to this section). The checkbox inside this column can have 3 states:
1. Not shown – that means that this route do not allow synthetic order types at all. This is configured by FCM Desk / GW OPS.
2. Shown and enabled (default state when shown for new accounts) – that means that synthetic order types are allowed for this account on this route.
3. Shown and disable – synthetic orders types will be rejected on this route for this account even though route itself allows them.

19. Continue with Account Authorization.
Permissions associated with this page
CAST Users > CAST Permissions > Account Management > Account > Create Account